Gravies, Carving and Wine
Episode 8 | 23m 46sVideo has Closed Captions
Carving a chicken and turkey; making stock and gravy; handling wine and champagne.
Carving a chicken and turkey; making stock and gravy; handling wine and champagne.
Problems playing video? | Closed Captioning Feedback
Problems playing video? | Closed Captioning Feedback
Gravies, Carving and Wine
Episode 8 | 23m 46sVideo has Closed Captions
Carving a chicken and turkey; making stock and gravy; handling wine and champagne.
Problems playing video? | Closed Captioning Feedback
How to Watch The Complete Pépin
The Complete Pépin is available to stream on pbs.org and the free PBS App, available on iPhone, Apple TV, Android TV, Android smartphones, Amazon Fire TV, Amazon Fire Tablet, Roku, Samsung Smart TV, and Vizio.
Providing Support for PBS.org
Learn Moreabout PBS online sponsorship- Hi, I'm Jack Pepin and all of the thousands of recipe that I've made over the years require one common ingredients and never change, the right technique.
30 years ago I wrote a book about cooking technique and 10 years ago I made this TV series and the information is just as relevant as always.
I hope you find this lesson helpful in your kitchen.
Happy cooking.
One of my favorite dish, if not my favorite is a planned roast chicken and I'm gonna show you today how to make a natural gravy, how to carve the chicken properly, how to de-fat stock, which are very important.
The chicken here has been roasted on one side, then on the other side, 20 minutes on one side, 20 minutes on the other side so that only the back is exposed.
So you don't have to base it, only at the end of it goes on the back this way.
And what I'm going to do with it, I'm going to show you how to carve it and with the dripping there, how to make the gravy.
But first I'm putting that on my board here.
I wanna discuss with you a little bit of that stock here.
As you can see, I have a chicken stock here, which I did last night.
I strength up put it in the refrigerator.
One way of removing the fat is to expose it to cold to of course the fat will solidify on top and you can remove it in one block.
To have a clean a stock should be fairly gelatinous.
In albumin, which is protein and basically de-fated, there is no salt in it.
So as you can see, you can see there, that it's like gelatinous.
This is the quality of a good stock that we are going to do, the fat, of course we remove, when the fat is hard, when the stock is hard, the fat come to the liquid so you have to remove it with a little little like that.
So what you do, you start this way picking it up on top of a stock.
When it's boiling, you have the same problem.
You use the bowl of this to push the fat on one side of thing, then turn it around very fast and pick it up.
You know this is the classic way while it's cooking and while it's cooking, usually boiling one corner and it push the fat over there, you turn it around and do this and you know at the end of it, actually when you feel that you still have a little bit of fat underneath after you finish it up and look after a while, one way of removing fat over the end of it is to use paper towel like this.
You put the paper towel on top that will absorb the pure fat, which is the fat, lift it up and pick it up right away.
And then you repeat that.
You wait a few minutes until the fat come back to the top again and you continue doing it this to end up with a purely clean sparkling de-fated stock, which is very important for many, many of the recipe that I do.
The stock is quite concentrated and it's good.
Another way which is nice also of doing it, to use one of those implements here, as you can see the fat come to the top.
And because of that funnel being very low, as you pour the fat stay on top and steep coming down, meaning that you only use the part of the liquid where there is no fat.
Now going on to our sauce here, or to our natural gravy, I wanna show you what I have there and what I have is a little piece of paper that I'm going to remove.
Now that little piece of paper, I put it because I cooked the chicken on its side and I was afraid that the breast, the skin of the breast must stick.
So I put a little piece of parchment paper and I'll notice that I'm trying to clean it up a little bit.
The reason is that I have a lot of crystallized juice attached to it and I don't want to get rid of that.
That's very good.
Now if you look at that sauce closely, this is a very good part.
The reason I say that is because they have crystallization of the juice, all over the place, that if the juice themself are crystallized in the bottom of the pan, that's what we call the glaze.
There is other thing in it.
There is fat and there is also moisture.
Now if I increase the temperature here and boil this, whatever is not fat and not crystallize juice will evaporate and I can see some steam coming out of it.
At some point it's going to start splattering.
It mean that whatever after to evaporate will evaporate you will be left with two component fat and crystallized juice.
The fat will break down, come to the top, the crystallized juice will attach to the bottom.
This is a good way of digressing.
At that point you can take your pot, put out the fat, and you are left with a crystallized juice or the glaze, then you deglaze that is you add liquid to melt those juice and it make a little bit of noise like this to make it brown, to make it break down rather into the fat.
And what we wanna do, if I were in the dining room, I would not use of course my finger.
I would take the chicken on the side here, cut a bit of the skin and pull out the rest of the chicken.
Here we are, you see the leg, same thing on the other side.
You see I cut my chicken and in the dining room I can also use a nicer appearance than this.
And now the joint of the shoulder is right there.
So I cut a piece of the breast as you can see here and remove it nicely.
Here we are the same thing on the other side.
I know there is a joint in the shoulder there.
You see those technique are very important because when you learn how to do that, you learn how to bone the meat raw and cooked.
And finally the only thing that I have left here is the carcass and the breast meat, which is right there.
So I cut the breast meat and pull it out to make it come out of the carcass, I can use my finger here because I am in the kitchen.
Here we are.
So this, I will arrange that on the tray directly in the bourgeois style.
You know we place the carcass back on top of it, the breast meat, I place it right back where it came from.
I will cut the end of the leg just for presentation here, place back one of the breast, the other breast, one of the leg, the other leg.
And again, as I say, we do the same thing in the dining room but without using my finger.
And now look at myself here, there is pure fat on top which I didn't have before and crystallize juice.
So what do I do now?
I should let it rest maybe a minute or so and then pull out the fat.
As you can see this is clear fat, all the taste now in there in the crystallized juice, if I want later on I can replace a tablespoon of fat or not.
But for the timing it's lean so I can delay it even with a little bit of white wine if I want.
And some of that chicken soup by pouring it this way will only get the bottom part of it.
And now I want the process of de glazing as I say, is to try to melt those solidified juice.
So use a flat spatula, preferably a wood one as I have here here the wood spatula I can against metal scrape it to melt all those glaze in the process of de glazing and create that natural gravy.
And this is why you need a good piece of equipment here.
If you have a very thin piece of equipment, the juice may burn.
You want to have crystallized beautiful juice but not burn.
What I could do also is to add a little bit of arrow root.
This is a thickening agent or a dash of corn starch, a little bit of water or wine just to dilute it if you want.
And a little drop of it if I want some viscosity there.
In some part of cuisine they tend to put butter in it to get it a bit thicker and I don't think it is necessary.
I just remove all the fat.
So I want it quite lean.
And now that natural gravy, because this just have to be brought to a boil like this.
I can strain it and I should actually use my spatula to get all of it out.
Here it is, I have it there now, that clear, beautiful gravy.
Now if I wanted to put a little bit of richness, a little bit of fat, I could now, I don't really think it's necessary.
So now that would go on top of course of my chicken.
I have a beautiful natural gravy.
This is very difficult to get in a restaurant, just a plan.
Natural gravy like that that you can serve on the boat, on the side or serve it if you want directly on top of the chicken, maybe a little bunch of water crest for the presentation.
And this is the real classic bourgeois style way of presenting a chicken.
(calm music) Years ago it was a most to carve the turkey in the dining room in front of your guest.
Nowadays, you know it's done occasionally, often in the kitchen, sometime in the dining room, sometime both.
I like to do it both ways.
You know, it doesn't matter.
Sometimes it's quite pleasing to do it in the dining room.
And of course if I do it in the dining room, a beautiful set of implement here, you have even that carving set with the fork to be able to lift up a big roast and hold it on top of it.
In any case here, what I would do with that is to bring it to my counter here to make it a bit easier.
The other spot, if I do it in the dining room, of course I will choose my finger just as I'm doing now, is to remove that big leg, and you have to break it this way.
Now the breast is easier done, but of course you want usually to give a little piece of the breast and a little piece of the dark meat.
Now the dark meat itself, very often people don't serve the drum because there is a lot of sinew in it or rather a lot of tendon.
But the thigh, I mean for me, the thigh is just about the best part of the meat.
So you would cut it that in a little slice here, on the plate next to the bird or on your board.
The breast is easier to do, you cut it right at the joint.
There is a joint here and after you can start cutting your slice down in this manner, so that's an easier way.
And a lot of people like dark meat.
A lot of people like white meat.
A lot of people like both.
I mean at my house usually we fight for dark meat.
Actually my wife like the the bone here, which is the wing there.
And I usually like to chew on that other part.
One of the best part of the turkey also is of course to do a stock the day after.
So you can carve it half of it in your dining room or in your kitchen that I'm doing here, rearrange it, which is often a way that I'm doing it and bring it to the dining room this way and serve it in the dining room.
Conventionally what you would want to do is to serve a piece.
You put your stuffing, then a piece of the dark meat on top of your stuffing, then a nice slice of the breast meat on top of the dark meat then a couple of other vegetable around.
Don't forget that you want maybe to put a little green garnish.
And this is one of the problem carving in the dining room is to have all of that with the turkey makes it a bit more difficult and a natural gravy, which for me is always the best to serve with it.
You can do that with the giblet or you can put a little bit around.
I like to put just a little bit to moist on the meat and the red I will pass it in a sauce board.
(calm music) Flank steak can be absolutely delicious but it has to be carved properly.
This is a very, not tough, but I mean very fiber piece of meat and the fiber goes into the direction this has been grilled and now you have to let it dress and carve it against the grain.
Preferably on a bias like this, you have to get in that and thin slice like this.
You can carve that in the dining room.
Also the slice I would like to come that very, very thin for the flank steak against the grain, you know, like this serving that directly.
It used to be done table side, in the restaurant, now where the metro would carve directly next to you at the table, a little bit of natural gravy and maybe a garnish of a vegetable or another.
And that was the end of it.
Carving technique, bring the food to another level of sophistication in the dining room and it make you able to show your beautiful piece that I have here.
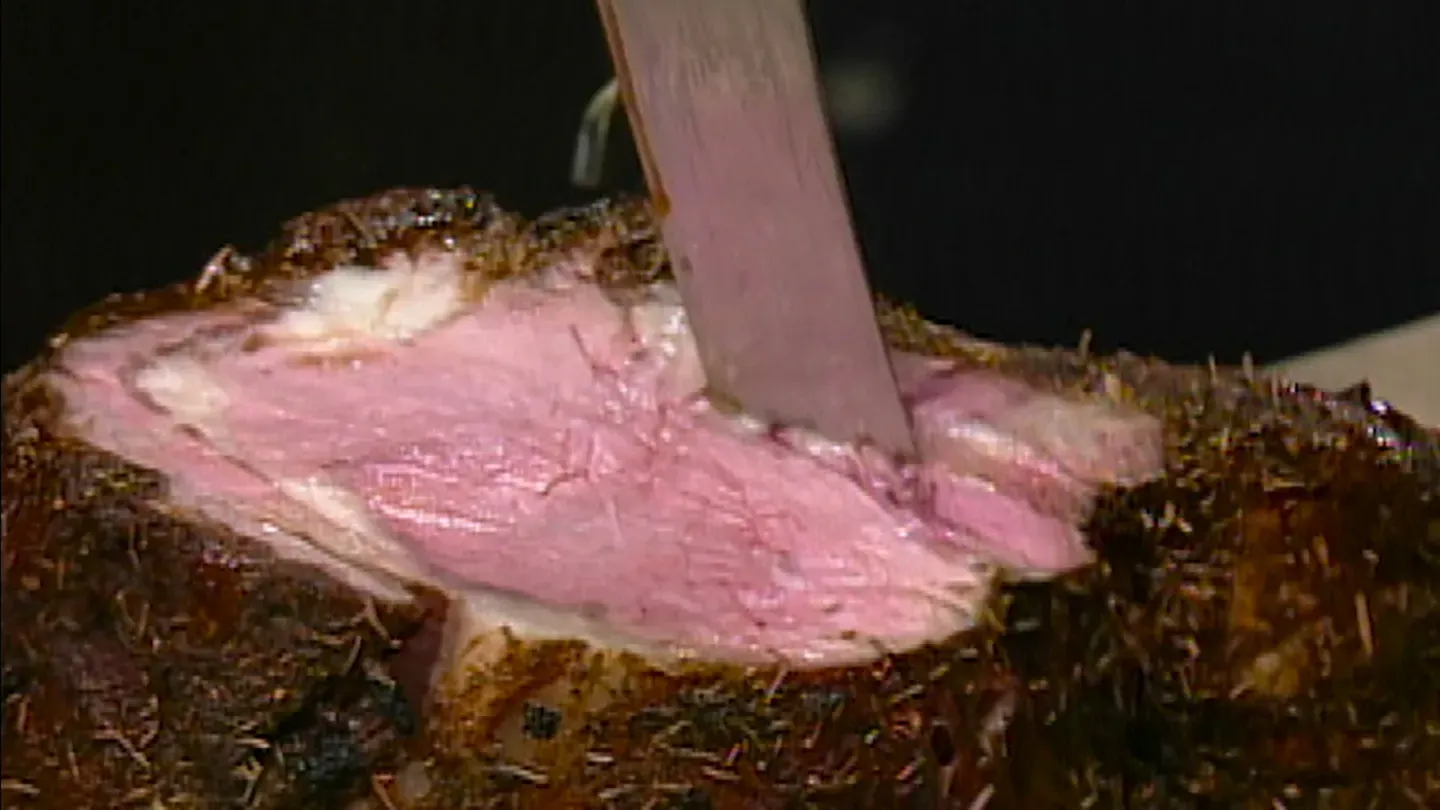
I have a little rust beef here.
It's three rib, it's fairly small, it's standing on its hand and you would carve it in that direction serving each of your guests.
The one first to want of course the first cut, the uncut so called, and you can now bring your knife down here to give you a nice cutting edge.
And now you can continue conventionally.
In French cooking particularly we would serve fairly thin slice of roast beef, rather than thick slice one.
And you see thin slice of roast beef like that, you would serve two or three slice like that to a plate, a little bit of natural gravy and that really make a nice show in the kitchen to do it.
Now if you want to serve a leg of lamb, and as you can see that leg of lime is a whole, the whole jigo we called in France, it finished with a crust of bread, crump and bread crump, garlic and herbs.
Usually there is a clamp.
You can have a clamp which attached to the end of that bone in the old style, particularly the British.
But otherwise you can hold it either with your hand this way again, do a little bit of a cut with your knife this way that prevent the knife from sleeping and cutting yourself and you start again on a bias.
Now there is different part of the lamb as you see, this is what we call (speaks in French).
That is the end of it, the shank, which I particularly love.
And you can arrange it directly either on your plate as you can see that that leg of lamb has been studied with slice of garlic, which is the right way of doing it.
Now you want to get more in the meaty part here where you get thicker slice, I mean the thinner slice or larger slice rather.
And this is part of the top round.
Again, you know, it is kind of conventional to serve thin slice, like the thin slice.
This way even those knife, you know in the dining room that you use occasionally only should be sharpened.
Three little slice like this.
You have a little bit of natural gravy which would go with it that you can put around.
And of course again, in your dining room, what you want to do is to serve, now the technique of serving in the dining room.
You use fork and a spoon.
Keep it in between like this as you want to grab your ingredient lab doing with the carrot like that tightening on top of it to grab some of my carrot here.
By the way, now the Chinese use two fork or two spoon rather very often and turn it upside down to make more of a pincher.
This way to grab it and one way or the other is perfectly fine.
You still have your garish here.
And even in that case here we have the little (speaks in French) here, which are those tiny waffle potato and that again could be served with this.
So there is a way very elegant of serving in the dining room.
So the most important technique of the dining room have to do with handling wine and champagne.
I have a bottle of champagne here that you want to cool off in those bucket.
Now look, this is full of ice and people fill that up and they wanna put it in there.
It doesn't work when you put ice in that bucket, you have to put water with it, you know, and whether to make a type of a slush.
So now you have no problem at all putting your bottle of champagne inside.
And if you have guests which come at the last moment and you say, well I need to shield that very fast, what do you do?
You take salt, cold salt and you put that into your bottle, you create a brine there and that brine 15, 20 minutes of twisting your champagne a little bit like that, it'll be ice cold.
So that's a good way of doing it.
Now, to open your champagne, what you do, you want to clean up the bottom first, especially if you have some ice inside, I mean some salt inside.
You have to find the side of the bottle where there is a little twist, which I have here, and undo that twist, which is holding the cap of the bottle and then move out the all cap together.
Being sure that to keep the top of your finger on top so that it doesn't get away from you.
Now, never look at your guest, always away from your guest when you're opening champagne.
Now take a towel, take the bottom of this and now you don't twist the cork, you twist the bottle, and when you feel it that it's slightly coming, you let it come.
It should happen with not too much noise.
I mean it's nice sometimes to make a lot of noise because this is the way you open champagne.
But a little twist like that is more than enough.
Then you pour your champagne.
I have two glass of champagne.
I have a flute, what we call a tulip glass here, like a flute and a coop.
Now as you see, you pour champagne twice, you pour it once, it tend to form up.
It'll form a bit less if the glass are actually very cold and then you pour it again about that amount will be more than enough.
Now there is the coup, which is the old classic way of serving champagne.
You pour it directly in there because it's spread out as you're putting it out.
Some prefer one, some prefer the other.
I tend to prefer, of course the tulip like this, but it's a question of choice.
Now moving on to wine.
If you want to open the wine, still, one of the best cork screw is the classic corkscrew that the wearer or the metro they use.
Be sure that the spiral that you have on your cork screw is a piece of metal twisted.
That's important.
Now what you do is to cut the part of the metal on top.
You don't remove that whole thing.
It's considered very, very unpolite in a sense, you know.
So you remove only one layer here that you can cut under here under that leap, you can cut it higher, then close your knife.
And what you do with there, which is important there, you have to really start in the middle of your cork, keep it straight, make sure that it goes in straight and you don't want to go through the cork because it may put little pieces of cork into the wine.
Then fold it and that here catching on the side of it will give you the proper lever to bring it this way and gently pulling it out.
You can look, clean it up a little bit around in case there will be a little bit of dirt here.
And then again you pour, I have different glass.
This is a glass for white wine.
This is for a board of wine.
This is for a burgundy wine and this is basically a whole purpose wine.
You can serve anything from beer to even champagne in this and it's perfectly fine.
Now if you want to open an old bottle of wine, not that this one is that old, but if it's really old, then you use a two-pronged type of cork opener where the center, like the conventional center of the cork screw right here go through the cork.
If the bottle is very old, it's going to make a hole in the center.
It'll crumble.
So you use those type of thing.
The fair thing you do, you cut the top again.
Now the other one I cut lower.
This one I can cut right here on top.
You see what you have, you have to cut enough of that metal to prevent the wine, the liquid from touching the metal as it pour.
So it can be lower or higher, but don't remove that.
Now with that two prong thing, you start with the big prong and you put the big prong on one side, then insert the other one, start pushing it and insert the other one on the other side.
And in order to put it inside, what you have to do now is to rock it this way and push it down.
When it's totally down, you will twist it and pull it up this way to pull your old bottle and oven.
And if it comes out, this one is the cork is quite long.
You put it back into it and again, rock it to put it and again pull out.
You see.
Now the advantage of that type of thing is that in all bottle of wine sometime you press this, you put it back, you rock it again, and you put it back right in your bottle.
When you pour that, you pour that gently more into that type.
This is a bourbon type of wine.
About a third of the glass should be full.
Sometime you pour it from higher if you want it to oxidize.
And if the wine is really very, very whole, you may want to decant it.
This is a decanter, this is not the case.
You only decant a wine, which at a certain age and have a deposit in the bottom of the bottle.
You take it out of your cellar, you may put it into a basket or leave it straight for one day at least.
So that, and then slowly you decant it like that.
You can put a match on a light underneath if you want like a candle so you can see through it so that you pour enough of the liquid.
When you see the thickening, the lower part of it, you know the residue you have in the bottom coming up.
Then you stop.
And when you know the proper technique to open the wine, it taste even better.
(calm music) There are obviously many more technique you can learn to make yourself a better cook.
But I hope I have encouraged you to pick up a few more skill in the kitchen.
Thank you for joining me and happy cooking.


Support for PBS provided by: